


Adobe Camera Raw Workflow for Color Correcting Fine Art Photographs
How to Color Correct and Edit Fine Art Photographs
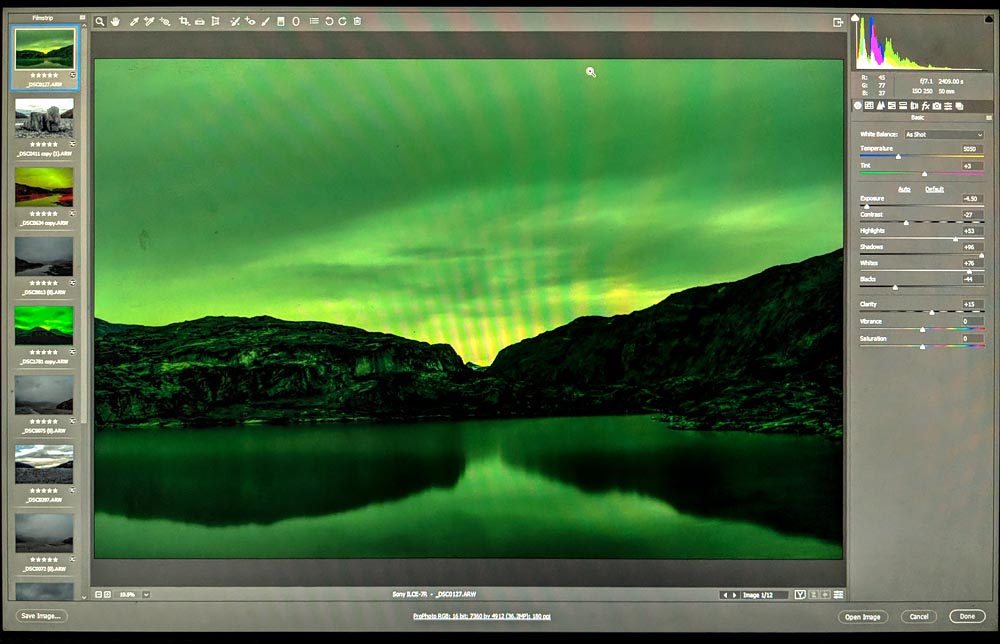
Working in ACR is the first, and in my opinion, the most crucial step in the workflow process.
After selecting about twenty images to start as a portfolio (this will be whittled down slightly along the way), I usually follow this color correcting workflow in Adobe Camera Raw (ACR).
Before Starting
-
Subdue or darken the light consistently in the editing area.
-
Warm up the monitor for about twenty minutes before starting.
-
Take frequent breaks when making subtle color changes because the eye can quickly adjust to what seems right at the time.
Initial Review
-
Create a Collection in Adobe Bridge for the portfolio of Raw photos.
-
Select all the images and right click or open them in ACR. The default is Fit in View size.
-
Start by just looking.
-
Pause on each image for a few minutes to gather a general impression, being mindful of different elements such as color, density, potential problem areas, sections you like, etc., then toggle down to the next.
-
I prefer to work on the whole portfolio at once to keep a cohesive vision.
Make Basic Density, Color, Other Changes
-
Play with density using Exposures slider.
-
Since subtleties might be hard to see, make slightly exaggerated changes and flip back and forth using Undo or use Swap Before/After Settings (a small icon on the lower right) to see what might be best. Then select an initial setting.
-
Adjust Tint and Temperature. Note that these changes could impact density, especially yellow (which opens up or generally lightens the image).
-
Make other initial changes:
-
Reduce Contrasts (I prefer to drop this down).
-
Boost Whites.
-
Lower Blacks.
-
Open Shadows, usually.
-
Bump or reduce Highlights.
-
Add a bit of Clarity.
-
-
All of these will probably impact the density and color, but that will be reviewed again shortly.
-
Move on to the next image, doing the same for each.
Pause: What is the Emotional Direction?
-
Pause and let this sit–for a day or a week.
-
Come back again and start by looking at the emotional direction of the photo.
-
How does this feel?
-
Is the mood right?
-
What is trying to be said here?
-
What direction is best (e.g., slightly darker and color colors, or more open and warmer to get a certain feel for the image).
-
Second Review; Fine Tune
-
Modify density for the second time, again switching between Undo or Swap Before/After.
-
Tweak color Tint and Temperature calibration once more.
-
A clear vision of the photo should begin to be taking shape.
-
Various changes to the color and density help develop both physical description as well as the meaning of the print.
View in 100% to Make Additional Tweaks
-
Expand to 100% view.
-
The larger view presents a slightly different but fuller idea of what the print might look like, and as a result, requires a slightly different set of additional modifications.
-
Focus on the darkest part of the image, adjusting Whites and Blacks to see if the shadows are blocked or if the contrast is too great.
Adjust for Later Masking
-
Think about masking to be made later in Photoshop and adjust density and color accordingly.
-
Usually I conceive of masks to preserve low-light sections which are the most problematic to lighten in Photoshop.
-
For example, it might most efficient to keep to image open and apply sky or other dark masks later.
Consider Adjustment Brush
-
Consider using Adjustment Brush (in 100% view, or more) very selectively to make local density and sharpening changes in larger areas.
-
This is not indented as a fine adjustment tool and does not replace masks.
-
Rather, I make as many changes in ACR to preserve detail since the image is latent and will not be degraded as it might be in Photoshop. Since my prints are somewhat large at 40×50″, this could be helpful.
Sharpen and Noise Reduction
-
Review Sharpening and Noise also in 100% view and adjust minimally, still thinking about selective sharpening brushes that will come later in Photoshop.
-
Spot out dust, specs, noise artifacts.
-
Continue to conceive of masking to come.
Final Review, Imagining The Final Print
-
Review for a last time, imagining how the final print will appear framed on a white wall.
-
Envision clearly the masks necessary to make this vision happen.
Lighten for Printing
-
Make final density change by adjusting Whites to be slightly lighter and more open because a print always looks darker than a computer screen, even with the right profile. This could require about a 10% or more change.
-
Again, I prefer to make these here to preserve the file in ACR as much as possible. Since I preserve ACR settings as a Layer in Photoshop, I can go back to make additional minor changes if necessary.
Time Frame and Next Steps
-
Generally, working two to three days a week, the ACR workflow might take about four weeks.
-
Next steps are sizing to final print dimensions, setting DPI and opening the files in Photoshop.
-
Another few months will be spent in Photoshop making Masks, applying sharpening and noise reduction and retouching.
Private Photography Tutorials
Comments are closed.